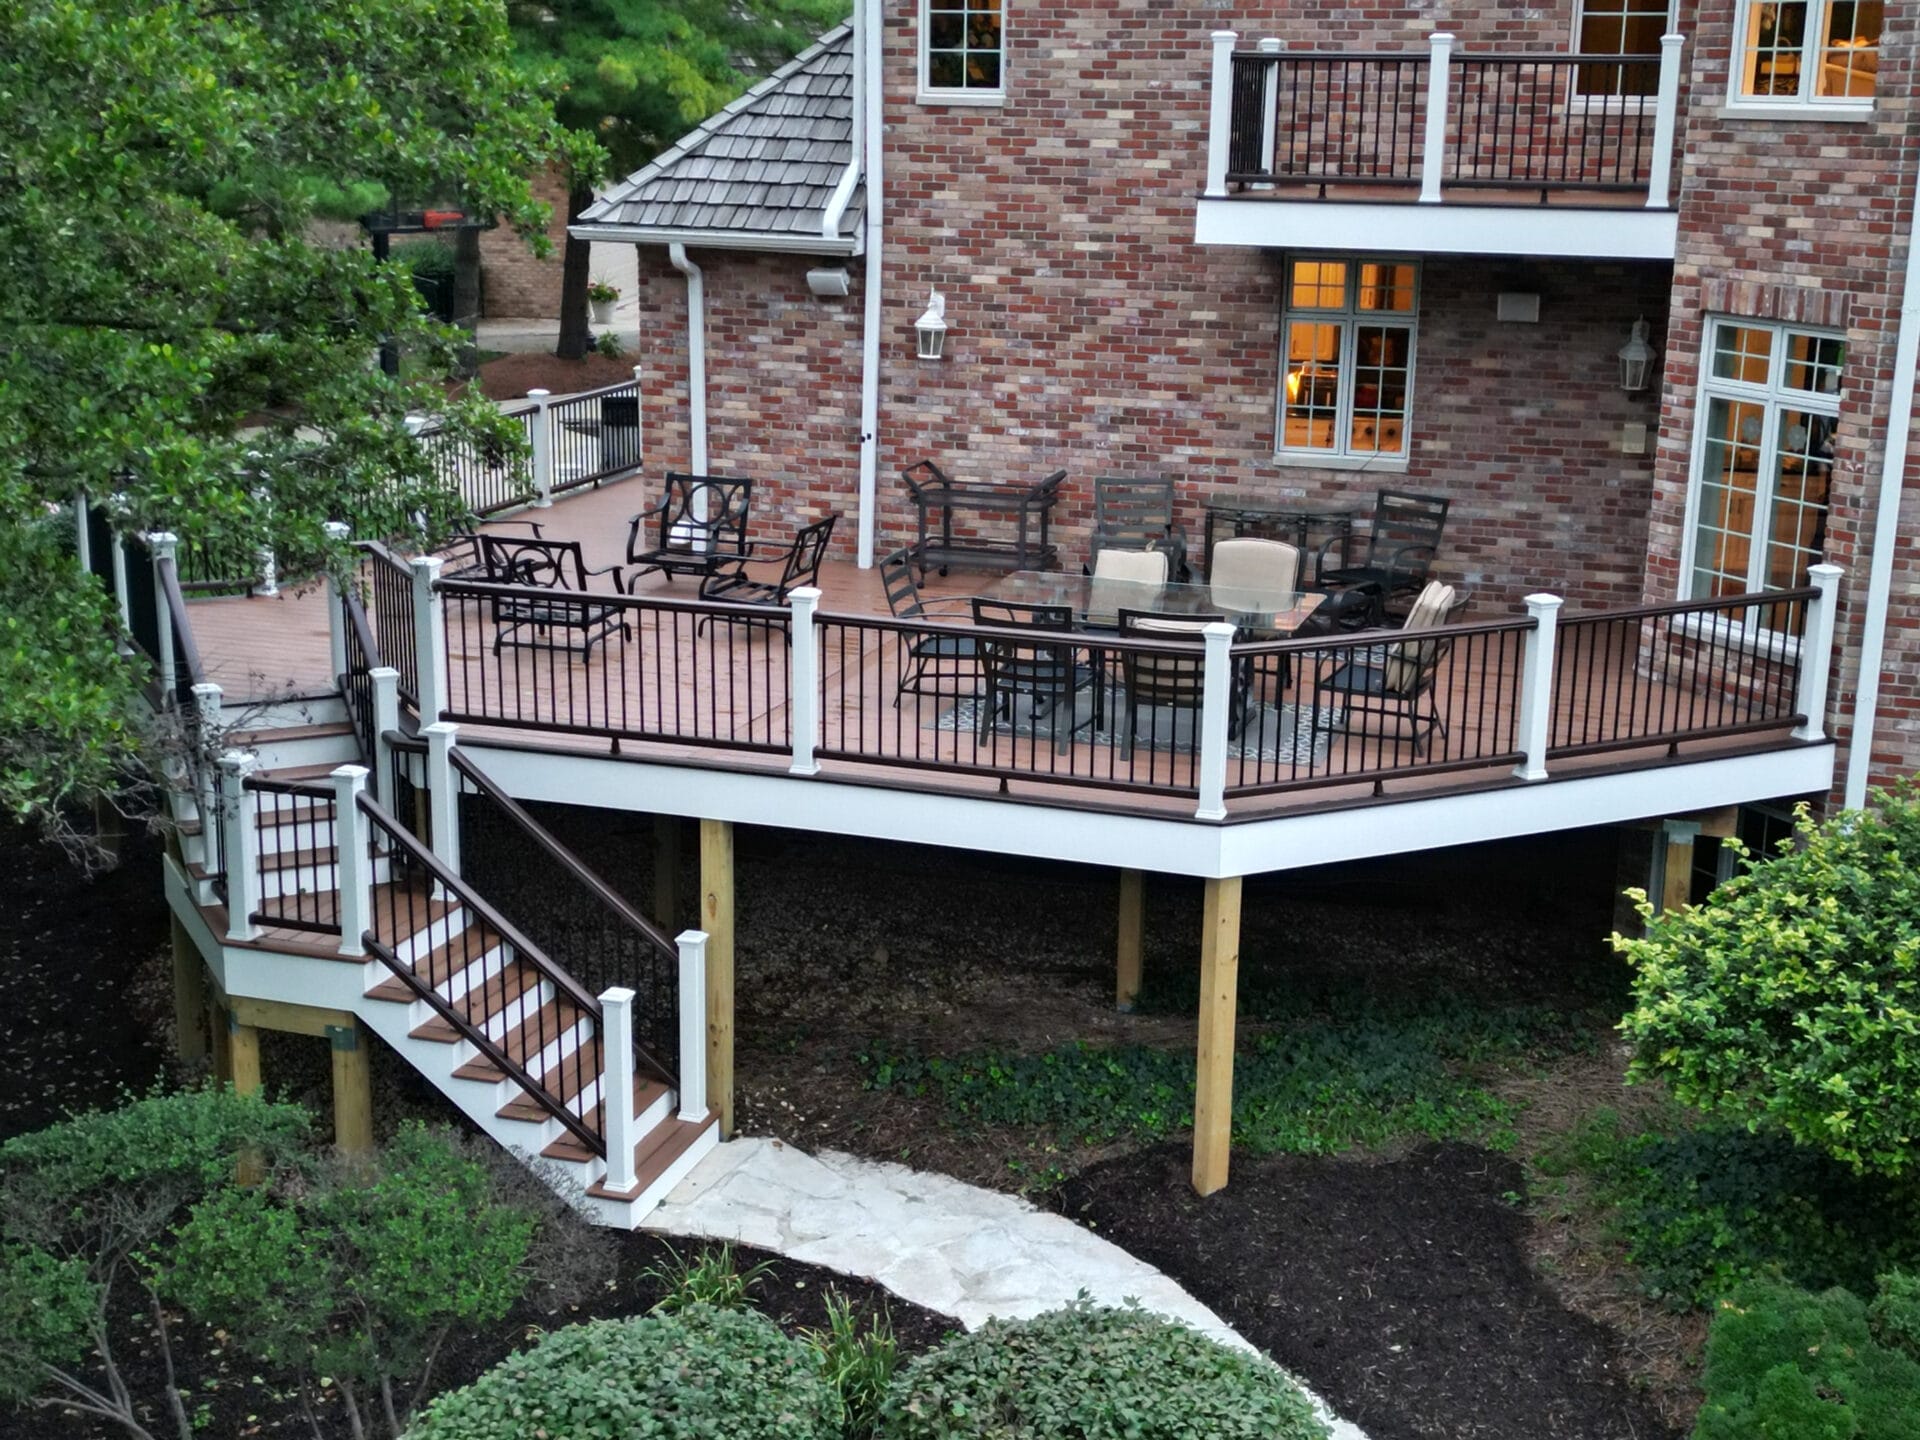
Transform your backyard or patio into a private paradise by leveraging the charm and functionality of a floating deck! Imagine stepping out onto a sturdy deck area, fabricated with precision-measured deck boards of optimal length. This is a construction that sets the scene for leisurely breakfasts, exciting barbeque parties, or tranquil sunset contemplations, all in your own way. In this blog post you will see how Warner’s Decking of Naperville will sail through the blueprint to erect your own outdoor oasis with a floating deck. With practical advice, insightful tips, and a touch of creativity—embark on this DIY journey nestled right within your backyard. No previous decking experience is necessary; all you need is the desire to create and install the deck boards to your ultimate alfresco haven!
A floating deck is a deck that is not attached to a building and instead “floats” on the ground. This type of deck, with its deck boards placed on a stable base, is relatively easy to build and can be completed in just a few days with intermediate-level skills. To build a floating deck, you will need to lay out the design, prepare the ground, create the deck frame, attach joists and corner blocking, install hidden deck fasteners, and finish with skirting boards. It’s important to check local regulations and obtain permits as needed before starting construction. Take extra care in ensuring your deck boards are perfectly aligned, both in length and at the ends.
Understanding Floating Decks
Before diving into the process of building a floating deck in your backyard or patio, it’s important to understand what exactly a floating deck is. Unlike traditional decks that are attached to the house and require footings or ledger boards, a floating deck is a freestanding structure that “floats” above the ground without any direct attachment to the house. This not only makes it easier and faster to build compared to traditional decks but also provides more flexibility in terms of its placement within your yard.
Imagine transforming that unused corner of your backyard into a cozy oasis where you can relax, entertain guests, or enjoy a meal outdoors. Here, deck boards form the heart of your deck area. A floating deck offers just that opportunity, giving you the freedom to create a beautiful outdoor space without worrying about extensive excavation or complex construction techniques.
The concept behind a floating deck involves creating a sturdy and level base foundation using simple construction methods such as concrete blocks placed on top of gravel. By distributing the weight evenly across multiple points of support, the deck remains stable without requiring deep footings or compromising the integrity of your deck frame or deck area.
Now that we have a better understanding of what a floating deck is and how it differs from traditional decks, let’s explore the benefits that come with choosing this versatile option for your outdoor oasis.
Benefits of a Floating Deck
Building a floating deck comes with numerous advantages that make it an attractive choice for homeowners seeking to enhance their outdoor spaces.
One of the key benefits lies in its ease and speed of construction. Compared to traditional decks that involve extensive planning, permits, and time-consuming processes like installing footings or attaching ledger boards, a floating deck can be built relatively quickly without the need for specialized tools or advanced carpentry skills. This means you can start enjoying your new deck area in no time.
Let’s say you decide on an impromptu gathering with friends and family. With a floating deck, you won’t need to worry about waiting weeks or months for construction to be completed. Your deck frame will be ready in no time, providing a solid base for the deck boards that will form your beautiful, inviting deck area.The simplicity of the deck layout in the design allows for faster installation by contractors without compromising on the structural integrity and aesthetic appeal of the deck, offering quality services to optimize your outdoor space.
Another advantage is its versatility in terms of placement and utilities. Unlike traditional decks that have prices which skyrocket based on their proximity to the house or specific architectural considerations, a floating deck can be fitted anywhere in your yard at an arguably better price. Whether you want it nestled beneath a tree, positioned near a pool, or situated in an overlooked corner of your property, the choice is yours. It offers the flexibility to work around existing landscape features, allowing you to create a seamless transition between your house and outdoor space with different decor products.
Furthermore, a floating deck offers easy maintenance. Since it’s not directly attached to the house, any repairs or renovations needed on the deck won’t disrupt the structure or integrity of your home. This means you can address maintenance issues independently and at your own pace, without affecting other areas of your property or incurring high prices with the help of contractors ensuring quality work.
Now that we’ve explored the benefits and services of a floating deck, let’s turn our attention to safety and stability considerations.
Safety and Stability Considerations
Building a floating deck can be an exciting project, but it’s crucial to prioritize safety and stability to ensure a durable and secure structure. Before you grab your tools and products, here are some key considerations to keep in mind.
Firstly, it is essential to check local regulations and obtain any necessary permits for decks above a certain height or if you plan to add any structures on top of the deck or attach it to your house. Compliance with building codes ensures that your deck meets safety standards and prevents potential issues down the line.
Next, consider the foundation of your floating deck. While traditional decks require footings or ledger boards, a floating deck eliminates the need for these by resting on sturdy concrete blocks. To enhance stability, it’s recommended to create ground-level deck footings using simple construction methods like placing concrete blocks on compacted gravel.
Proper placement of the concrete blocks is crucial for ensuring even weight distribution and preventing sinking or shifting over time. Leveling and adjusting each block is vital to ensure that your deck remains stable and safe.
Another factor to consider is the overall load-bearing capacity of your deck. Understanding how much weight your deck will need to support is essential for selecting appropriate materials and reinforcing the structure accordingly. Take into account factors such as furniture, plants, and the number of people who will use the deck at once.
Additionally, consider the climate and weather conditions in your area. If you live in an area with heavy snowfall or high winds, you may need to reinforce your deck design to withstand these elements. Consulting with a professional or experienced builder can help you determine any additional measures needed for stability in your specific climate.
By prioritizing safety and stability while leveraging the services of quality contractors during the construction process, you can create a floating deck that not only looks fantastic but also provides a secure space for outdoor enjoyment.
Floating decks typically sit no more than 12 inches above the ground, making them safer and more attainable for DIY builders compared to traditional high-rise decks.
A survey by HomeAdvisor found that the average cost of building a deck from scratch, such as a floating deck, ranges between $4,073 and $10,421 depending on materials and size.
According to the International Code Council (ICC), any attached deck over 200 square feet in size or over 30 inches off the ground requires a permit across most U.S. regions.
Planning Your Deck Design
Once you’ve addressed the safety and stability considerations and calculated the prices for materials and contractors’ services, it’s time to move on to the creative and exciting part of planning your deck design with the best products in the market.
Your deck can indeed become the ultimate outdoor oasis, tailored to your specific needs and style preferences. The ability to create and modify such a space embodies both business acumen and personal satisfaction.
Start by assessing the available space in your backyard similar to a company evaluating its assets. Consider any limitations or obstacles such as trees, existing structures, or grading issues that may impact the layout of your deck. Measure the area using stakes and string or other marking tools, just as a service provider would quote an estimate for a project. It allows you to visualize the dimensions and potential of your deck.
As you consider how to use your floating deck, you might see it as a setting for hosting summer barbecues and gatherings, similar to company events. Alternatively, it could serve as a tranquil retreat for relaxation and unwinding after a long day, providing the same value as a private sanctuary.
In terms of navigating your deck, ensure there is efficient access from your house to the deck, similar to the operational navigation within a business. Consider pathways leading to other areas of your backyard, such as a garden or pool. Strategically placed steps or ramps can enhance accessibility and convenience—much like the pros of well-organized office spaces.
When it comes to materials, put your artistic strength into practice. You have several options, from composite decking that offers durability and low maintenance to traditional wood decking that brings natural aesthetic appeal. Research different materials to determine which best suits your style, budget, and maintenance preferences.
Like a professional interior designer, pay attention to elements such as seating areas, lighting, and additional features like built-in planters or pergolas. Remember the importance of complementary colors that can accentuate your personal taste and overall outdoor design aesthetic.
For instance, if you enjoy stargazing at night, incorporating dimmable LED lights into the deck’s perimeter can create a magical ambiance during evening hours, just like a well-executed company presentation with adequate light and color factors.
Remember to consider privacy as well. Depending on your property’s layout and your desired level of seclusion, you might want to incorporate elements like screens or trellises covered in climbing plants that represent the solid shields businesses use to maintain confidentiality.
From here on out, let your creativity shine as you design the perfect floating deck that fulfills both functional and aesthetic desires for an outdoor oasis, mirroring the company’s mission statement. An oasis that you can enjoy for years to come.
Materials Needed for a Floating Deck
Building a floating deck requires careful planning and gathering the right materials, like launching a successful business venture. Here are the essential items you will need to create your outdoor oasis:
1. Decking Material: Choose from a variety of options such as pressure-treated lumber, cedar, or composite decking boards. Each material has its own advantages, so consider factors like durability, maintenance requirements, and aesthetic appeal when making your selection.
2. Support Posts: These are the vertical structures that provide stability and support for your floating deck. Opt for pressure-treated lumber or metal posts that can withstand outdoor conditions and distribute weight evenly.
3. Joists: Joists are horizontal beams used as the mainframe, a strength of any good business infrastructure, that connect the support posts and form the framework of the deck. They should be sturdy enough to handle foot traffic and support the weight of furniture or other elements you plan to add.
4. Deck Screws or Nails: Similar to the business strategies that hold a company together, you will need screws or nails designed specifically for outdoor use to secure the decking boards, joists, and support posts together. Make sure they are resistant to rust and corrosion.
5. Concrete Blocks or Footings: These serve as the foundation for your floating deck and help distribute its weight evenly across the ground. It parallels a company’s solid service and value foundation for its success.Assembling a qualified team to assist in your project can make the job of building a concrete block or footing foundation smoother. These should be placed securely on level ground to ensure stability. Depending on your preferences, you might choose different sizes or even color variations for these blocks.
6. Gravel or Crushed Stone: The addition of a layer of gravel or crushed stone beneath your deck plays a significant part in the infrastructure. It assists with drainage and prevents harmful moisture buildup that could potentially lead to rotting or warping of the wood. Few people ever question the importance of this step.
7. Lattice Skirting (optional): For those who appreciate finer details, the option to install lattice skirting around the perimeter of your deck is available. It helps to conceal the space underneath, granting a more finished look with the variation in sizes and color giving a unique touch to your project.
Imagine creating a floating deck using composite decking boards for their low-maintenance properties and long-lasting durability. You would gather your team and delegate the job to install pressure-treated support posts, spanning them with sturdy joists secured by weather-resistant screws. The deck bases on a foundation of perfectly-sized concrete blocks or footings, ensuring stability on level ground. Furthermore, a layer of gravel or crushed stone is add beneath the deck for proper drainage, eliminating any questions of moisture build-up.
Remember, the specific materials you choose will depend on your preferences, budget, and local availability. It’s always a good idea to consult with a professional team or a knowledgeable staff member at your local home improvement store for guidance.
Local Regulations and Permits
Before embarking on your floating deck project, it’s crucial to familiarize yourself with the local regulations and obtain any necessary permits. Building codes and permit requirements can vary from one municipality to another, so take the following steps to ensure compliance:
1. Research Local Codes: Start your job by researching the building codes and regulations specific to your area. These codes may dictate factors such as maximum deck height, setback requirements from property lines or existing structures, and safety considerations, among other things.
2. Contact Your Local Building Department: Reach out to your local building department to understand the permit application process. They will provide you with the correct application form, inform you about any fees involved, and can answer any lingering questions you may have.
3. Prepare Required Documents: Typically, you’ll need to submit several documents along with your permit application. These may include a site plan indicating the deck’s sizes and location on your property, construction plans detailing dimensions and materials, and elevation plans showcasing height measurements.
4. Obtain Necessary Inspections: Once your floating deck is built, it will likely need to be inspected by a building inspector at various stages of construction. Ensure that you schedule these inspections as required by local regulations to ensure safety compliance.
Think of obtaining permits as charting out a clear path before embarking on an exciting adventure. Just like how gaining permission and adhering to regulations ensure the safety of thrill-seekers in an amusement park, securing the appropriate permits for your floating deck project ensures that your outdoor oasis is sturdy, safe for enjoyment, and appropriately color-coordinated.
Before starting any project on a floating deck, it is important to understand and comply with the local regulations. This involves researching building codes, contacting the local building department, preparing required documents, and obtaining necessary inspections to ensure compliance with safety standards. Gaining permission and adhering to regulations will not only ensure the safety of your outdoor oasis but also prevent possible legal issues that may arise down the line.
Step by Step Guide to Building a Floating Deck
Building a floating deck can be an exciting project that transforms your backyard into the ultimate outdoor oasis guided by your team’s support. While it may seem daunting, following a step-by-step guide will make the process much more manageable.
1. Plan and Design
Start by planning and designing your deck. Consider its purpose, size, and location in your backyard. Measure the area where you want to build the deck and decide on the dimensions. Sketch out a rough design or create a digital representation to visualize how it will look.
2. Obtain Permits and Check Regulations
Before starting construction, it’s crucial to check local regulations and obtain any necessary permits. Certain height restrictions or building codes might apply depending on your area. Ensuring compliance with these regulations will prevent any future issues.
3. Gather Materials
Next, gather all the materials required for building the deck. This includes composite decking boards, hidden fasteners, concrete blocks, gravel, screws, metal angles, and skirt boards. Depending on your budget and preferences, you can choose premium materials or opt for more affordable alternatives.
4. Prepare the Ground
Prepare the ground where the deck will be placed by removing any grass or vegetation. Level the area using a shovel or garden rake to ensure a stable foundation. To create footings for your deck’s support beams, place concrete blocks on top of compacted gravel at regular intervals.
5. Place Footings and Beams
With the ground prepared, start placing footings at each designated spot according to your deck’s dimensions. Make sure they are level and aligned correctly before proceeding to install the support beams on top of them.
6. Square the Beams
To ensure the stability of your floating deck, double-check that all support beams are perfectly squared to each other using a carpenter’s square or measuring tape diagonally across opposite corners. Adjust as necessary.
7. Lay Out the Beams and Prepare for Joists
Now, lay out the deck beams according to your design plan, leaving spaces for joists between them. Align the metal angles with each beam’s end and secure them with screws, providing additional stability.
8. Attach Joists and Corner Blocking
Attach joists perpendicular to the beams using hidden deck fasteners or screws. These joists will provide the frame for the decking boards. Additionally, install corner blocking at the junctions of the beams and joists to strengthen the structure.
9. Install Decking Boards
Finally, install the decking boards on top of the joists, using hidden deck fasteners or screws for a clean and seamless look. Make sure to leave appropriate gaps between each board to allow for drainage and expansion.
10. Finish Steps and Skirt Boards
If you plan on having steps leading up to your deck, frame and construct them at this stage using treated lumber or composite materials. Then, attach skirt boards around the perimeter of your deck to hide any exposed supports and create a finished appearance.
Now that you have successfully built your floating deck, it’s important to understand how to maintain its beauty and structural integrity over time.